Friday, January 1, 2021

HOW TO CREATE PARTITIONS in LINUX


We can  divide a single hard drive into many logical drives (like Partition 1, Partition 2 etc.) that is called partition.
It is logical blocks on a drive you can treated as an independent disk. A partition table is an index that relates sections of the hard drive to partitions.


Disk Partitioning Criteria:

                                    MBR = MASTER BOOT RECORD
                                    P= PRIMARY PARTITION
                                    EXTENDED= EXTENDED PARTITION
                                    L= LOGICAL PARTITION
                                    FREE= FREE SPACE

We can divided disk into only 3 Primary Partitions.Primary Partition is a usually holds the operating system.
Extended Partition is a special type of primary partition We can be divided into multiple logical partitions. We have only 3 primary partitions per disk, and if the user is required to make further partitions there are the space remaining on the disk so user can be allocated to extended partition and user can used it  create the logical partitions later.

How Can Disk Identification

Different type of disks in Linux
                           IDE drive will be shown as /dev/hda
                           SCSI drive will be shown as /dev/sda
                           Virtual drive will be shown as /dev/vda

Types of file systems used in Linux:

The file systems supported in Linux O.S .We have ext2, ext3, xfs ,ext4, vfat in RHEL etc.
Ext file system is the widely used file system in Linux.
vfat is the file system to maintain a common storage windows .

Mounting Point in Linux:

(a) /etc/mtab:- is a file which stores the information of all the currently mounted file. it is dynamic and keeps changing.

(b)/etc/fstab is the file which is keeps information about the permanent mount point so that it will be mounted even after reboot .

   HOW TO CREATE FILE SYSTEM IN LINUX

Check partition using in linux :

                                                root@server~#fdisk –l or parted –l

Partition using fdisk

                                    root@server~#fdisk <disk name>
                                    root@server~#fdisk /dev/sda
                                                                 

 Use n to create a new partition using n and show list using p.

                                root@server~#fdisk /dev/sda   (ENTER)

                                  PRESS n
                                  first cylinder       select (Primary Partition)  
                                  second cylinder  pass size   +100G (Give Size)

                              command( m for help) p  (Show list)

Deleting a partition:-
                                       Use d to delete a partition
                                   
                                    command( m for help) d 
                                    partition no : 2  ( you want to delete choose)

Saving the partition changes:-
                                                  USE w to save changes
                                          
                                    command( m for help) : w
Lab Task :-
                 # fdisk -l
root@server~# fdisk /dev/sda
                               Command (m for help) : n
                               (type n for new partition)
                               (p - primary) or e - extended) : p
(type p for primary partition or type e for extended partition)
                        First cylinder : (press Enter for default first cylinder n                         Last cylinder : + <size in KB/MB/GB/TB>
Command (m for help) : t
                                                         (type t to change the partition id)
(for example: 8e for Linux LVM, 82 for Linux Swap and 83 for Linux normal partition)
                                Command (m for help) : w
(type w tosave the changes into the disk)
                            root@server~# partprobe /partx -a/dir1 /dev/sda1
(to update the partitioning information in partition table)

Mounting a partition

Mounting is a procedure where we attach a directory to the file system.
There are two types of

Temporary Mounting

A temporary mount point we will create a directory and mount it, but this mount point will last only till the system is up, once it is rebooted the mounting will be lost.
                           root@server#mount /dev/sda1 /dir1
Unmount Partition:
                           root@server#umount <mount point directory>
                           root@server#umount /dir1
                                                                    verify it with mount command.

Permanent Mounting

We can permanent mount the file system,but we have to update all details in this  file /etc/fstab , after mounted file system  we have to reboot the system.
Steps To make a permanent mount point:

root@server~

root@server~

root@server~

root@server~

How to see the size of the file or directory?

root@server~# du -h

(to see all the file sizes which are located in the present working directory)

To see the biggest files from current location)

root@server~# du .| sort -nr | head -n10

To see the biggest directories

root@server~# du -s * | sort -nr | head -n10


Assigning label to the partition:
Assigning the label is giving some name to the partition. To assign label to the partition e2label
command is used
Syntax
root@server#e2label <partition name> <label>
root@server#e2label /dev/sda7 ktdisk
To check the label
root@server#e2label /dev/sda7

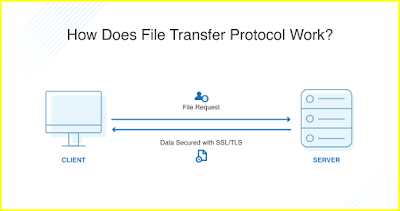

How to congigure File Transfer Protocol Server (FTP)


 FTP server :
(a).FTP Server is used  upload and download the files and directories cannot be downloaded.
(b).The FTP server package is  vsftpd.The FTP client packages are ftp and lftp and deamon is vsftpd .
(c)Port numbers 20 for data connection and 21 for FTP command connection.


Configure FTP SERVER

Step1: Install the package

           root@server~#yum install vsftpd* -y

Step2: Start servies
            
           root@server~#systemctl start vsftpd

Step3: Copy or create some files in “/var/ftp/pub” directory

                        root@server~#cd /var/ftp/pub
                        root@server~#touch file{1..5}


Step4: Restart servies and add ftp service in firewall
            
           root@server~#systemctl restart vsftpd


           root@server~# firewall-cmd --permanent -add-service=ftp 
           root@server~# firewall-cmd --complete-reload

Configure the FTP client and  connect the ftp server:-

Go to the client machine and install the FTP

                             root@server~#yum install ftp* -y

Connect the FTP server from client.

Example : # ftp  192.168.0.10 or ftp://server.example.com
                       Username : ftp
                       Password : <press enter key>
                       ftp > ls
                                         (to see the files in the FTP document root directory)

Configure the Secure FTP server

                 root@server~# vim /etc/vsftpd/vsftpd.conf
Go to line search this
                                          ananymous_enable=no
                                                                                     (save and exit the file)

                                      ananymous_enable=yes         (It is by default)
It means anybody can login to the FTP server without any username and password. then we must provide the username and passwords .

Restart the ftp deamon by

                      root@server~# systemctl restart vsftpd

SET the FTP user password by

                               root@server~# passwd ftp

Go to client side and connect the FTP server by

                             root@server~# ftp 192.168.0.10

Configure the FTP server to upload the files


                              root@server~ # vim /etc/vsftpd/vdftpd.conf

Go to line no :
                                         writable_enable=yes
 
                                       anon_upload_enable=yes
                                                                                  (save and exit the file)
Make the upload directory in /var/ftp/pub directory by -
                                 
                             root@server~ # mkdir /var/ftp/pub/upload

Change the group of the upload directory

                          root@server~ # chgrp ftp upload

Change the permissions of the upload directory by

                             root@server~ # chmod 775 upload

To permanently add the ftp service to SELinux policy by

                             root@server~ # getsebool -a | grep ftp
                                                             (to check the SELinux Booleans for FTP service)
# setsebool -p allow_ftpd_anon_write on
# chcon -t public_content_rw_t upload
(to add read-write context of the upload
directory)


How to configure NFS Server


Package of nfs


                          Package                   : nfs*
                          Daemons                 :rpc.nfsd, rpc.mountd, rpc.statd, rpc.lockd
                                                           rpc.rquotad
                          Script                     :     /etc/init.d/nfs  
                          Port number           :    2049
                          Configuration File  :    /etc/exports

                          Other imp files       :   /var/lib/nfs/etab, /var/lib/nfs/rmtab


Steps to configure NFS server:

Step1: Install the NFS package using yum or rpm.

                      root@server~#yum install nfs* -y

Step2: Create a  directory on partition and add some data in it.

                       root@server~#fdisk   /dev/sda

Step3: Export the directory by editing /etc/exports file and using exportfs command
                      root@server~#mkfs.ext4 /dev/sda1

                      root@server~#chmod 777   /nfs_share_dir
                      root@server~#mount  /dev/sda1 /dev/nfs_share_dir
                      root@server~# chcon -t public_content_t  /nfs_share_dir

Step4:  The mount point and add some data in it
                      root@server~#cd   /dev/nfs_share_dir

                      root@server~#touch file{1..5}
 
                      root@server~#cd   /dev/nfs_share_dir

Step5: Export the directory
                      root@server~#vim /etc/exports
                                                /dev/nfs_share_dir   192.168.0.10 (rw,sync)
Step6: Execute exportfs command
                        root@server~#exportfs –avr

Step7:Restart the services
                          root@server~# systemctl restart nfs-server
Step8:Add firewall services
                          root@server~# firewall-cmd  --permanent  -add-service=nfs
                                                                 (to enable the nfs service at firewall)
                          root@server~# firewall-cmd --permanent -add-service=mountd
                                                                  (to enable the mountd service at firewall)
                          root@server~# firewall-cmd --permanent -add-service=rpc-bind
                                                                (to enable the rpc-bind service at firewall)
                          root@server~# firewall-cmd --complete-reload

Client side configuration for NFS mounting


Step1:Install the NFS package if not installed
                       root@client~#rpm –q nfs

Step2:Start the NFS services
                        root@client~#systemctl restart  nfs

Step3:Start the NFS services
To check the exported directories from server

                       root@client~#showmount –e  192.168.0.10

Step4: Make a directory

                       root@client~#mkdir /nfsclient

Step5:  mount NFS .

     root@client~#mount –t nfs 192.168.0.10:/dev/nfs_share_dir  /nfsclient


Note:
(i)NFS does not support cross plat forms. it will not support the sharing the files between Linux and  Windows systems.
(ii) NFS does not support encryption of the data and it supports only plain text format.


APACHE Load balancing using pound


Pound load balancer is used as reverse proxy server . It will distribute request to the backend servers.backend server is configure by Apache server  which will accept the incoming request from port 80 & 443 . Then it will distribute the request to backend one or more servers.
Example:-
if we have two backend servers first request will go to Apache web server1 & then to Apache web server2 and  then pound server will deliver the content back to clients as per the request (reverse proxy).


Configure Pound load-balancer:-

Pound Server1 :#pound.example.comStep 1:-
  • We have to installed pound load balancer  (epel repository).
  •  Install EPEL repository using the following steps.

Install both EPEL repository at Pound Server1

RHEL/CentOS 7


IP ADDRESS :- 192.168.0.10

root@pound~#rpm -Uvh https://dl.fedoraproject.org/pub/epel/7/x86_64/Packages/e/epel-release-7-11.noarch.rpm

root@pound~# yum install pound

We need to two machine for backend server

Server 1 :  HOSTNAME :-  server1.example.com 

                 IP ADDRESS :- 192.168.0.11

Server 2 :  HOSTNAME :-  server2.example.com 

                  IP ADDRESS :- 192.168.0.12

Now Configure Pound server :-

root@pound~#systemctl restart pound

root@pound~#vim  /etc/pound.cfg
                      ListenHTTP
                           Address  192.168.0.10
                           Port 80
                      End

                      ListenHTTPS
                           Address  192.168.0.10
                           Port    443
                      Cert    "/etc/pki/tls/certs/pound.pem"
                      End

                      Service
                        BackEnd
                              Address 192.168.0.11
                              Port    8888
                        End

                       BackEnd
                              Address 192.168.0.12
                              Port    8181  
                       End
                    End

 (SAVE AND EXISTS)

root@pound~#systemctl restart pound

Checking the load balancer

To check the load balancer, open browser and enter the Pound server’s IP address  192.168.0.10. It will open the web page  page & you will then be redirected to web server 2 and web server 1.

Refreshing web page and  you will see that one request goes to server 1 and then to server 2.

When some one send request one server pound server is redirect request one server to other server and hide original IP server .


How to Configuration Apache web server

 Apache Configuration  

HOW TO CONFIGURE VIRTUAL WEB HOSTING 

 [root@dev ~]# vi  /etc/httpd/conf.d/ip.conf
<VirtualHost 192.168.0.10:80>
ServerAdmin root@dev.example.com
ServerName  www1.example.com
DocumentRoot /var/www/
</virtualhost>
<Directory "/var/www/">
AllowOverride none
Require all Granted
</Directory>

[root@dev ~]# vi /var/www/index.html 

[root@dev ~]# vi /etc/hosts 

192.168.105.62 www1.example.com
192.168.105.62 www2.example.com

[root@dev ~]# firewall-cmd --permanent --add-service=http
success
[root@dev ~]# firewall-cmd --complete-reload
success

[root@dev ~]# elinks www1.example.com  

HOW TO REDIRECT WEBSITE

 [root@dev ~]# vi  /etc/httpd/conf.d/virtual.conf  

<VirtualHost *:80>
ServerAdmin root@dev.example.com
ServerName  www1.example.com
DocumentRoot /var/www/
Redirect  /  "https://www.ecollege.life"
</virtualhost>
<Directory "/var/www/">
AllowOverride none
Require all Granted
</Directory>
 

[root@dev ~]# vi /var/www/index.html

PORT BASED WEB HOSTING

 [root@dev ~]# vi  /etc/httpd/conf.d/port.conf  

<VirtualHost *:8999>
ServerAdmin root@dev.example.com
ServerName  www1.example.com
DocumentRoot /var/www/
</virtualhost>
<Directory "/var/www/">
AllowOverride none
Require all Granted
</Directory>

[root@dev ~]# vi /var/www/index.html  
[root@dev ~]# vi /etc/httpd/conf/httpd.conf  
Listen 8999
[root@dev ~]# semanage port -a -t http_port_t -p tcp 8999
[root@dev ~]# firewall-cmd --permanent --add-port=8999/tcp
success
[root@dev ~]# systemctl restart httpd
[root@dev ~]# firewall-cmd --complete-reload
[root@dev ~]# elinks www3.example.com:8999
[root@dev ~]#firewall-cmd --permanent --add-port=21/tcp 
[root@dev ~]#firewall-cmd --permanent --add-service=ftp
Restart firewall:
[root@dev ~]#firewall-cmd --reload
[root@dev ~]# netstat -tulpn | grep LISTEN


Redundant Array of Independent Disks(RAID)


            Redundant Array of Independent Disks

RAID :-

It provides fault tolerance, load balancing using stripping, mirroring and parity concepts.
                                                     

Types of RAIDs available

Two types of RAIDs available.

Hardware RAID

It is depends on vendors and  it is also more expensive .

Software RAID

It does not depends on vendors and not expensive .Compared to Hardware RAID .
it is maintained by system administrator only.


                To configure RAID - 0 in Linux


To configure RAID - 0,

Requirement -  2 minimum disks

Partition id -    "fd".

Solution :-
Reading and writing is very fast. So, it produces high performance.

Problem :-
if one disk is failed we cannot recover the data. So, there is no redundancy and fault tolerance in RAID - 0.
For example if the data is A1, A2, A3, A4, A5 and A6,A7,A8

We have Two Disk  :Disk -1   is            /dev/sda
                                Disk - 2 is           /dev/sdc


root@server~#fdisk  -l    ( Check free space in disk)

root@server~#fdisk  /dev/sda   ( Chose disk  according to your system space)

root@server~#n     (Enter n for new disk)

root@server~#t      ( t used for choose your code lvm code is fd)

Note : You can use code 8e etc.


                      Configure  RAID - 0 using disk - 1 and disk - 2

root@server~
# mdadm -Cv       /dev/md0 -n 2 /dev/sda /dev/sdc   -l   0


To check the RAID - 0 is created or not :-
root@server~# cat /proc/mdstat

To create the ext4 file system on the RAID - 0

root@server~# mkfs.ext4 /dev/md0

RAID - 0 mount point

root@server~# mkdir /mnt/raid0
root@server~# mount /dev/md0 /mnt/raid0

See the details of the RAID - 0 partition
root@server~# mdadm -D /dev/md0

               Configure RAID - 1 in Linux

                                                      
To configure RAID - 1,
Required- minimum 2 disks
Partition id - "fd".

Solution :-
1.In this the same data will be written on 2 disks ie., exact copy on both the disks.
2.One disk is failed we can recover the data from another disk.
3.There is a high availability, redundancy and fault tolerance in RAID - 1.
Problem :-
In this writing speed is slow compared to RAID - 0.


For example if the data is 1, 2, 3, 4

We have Two Disk  :Disk -1   is            /dev/sda
                                Disk - 2 is           /dev/sdc


root@server~#fdisk  -l    ( Check free space in disk)

root@server~#fdisk  /dev/sdc   ( Chose disk  according to your system space)

root@server~#n     (Enter n for new disk)

root@server~#t      ( t used for choose your code lvm code is fd)

Note : You have to configure the disk as disk1 or you can use code 8e etc.

Create the RAID - 1 using disk - 1 and disk - 2

root@server~
# mdadm -Cv       /dev/md1 -n 2 /dev/sda /dev/sdc     -l    1

To check the RAID - 1 is created or not :-

root@server~# cat /proc/mdstat

To create the ext4 file system on the RAID - 1

root@server~# mkfs.ext4 /dev/md1

RAID - 1 mount point

root@server~# mkdir /mnt/raid1
root@server~# mount /dev/md1 /mnt/raid1

See the details of the RAID - 1 partition

root@server~# mdadm -D /dev/md1

                Configure RAID - 5 in Linux


To configure RAID - 5

Required Minimum 3 disks
Partition id - "fd".
1.In every disk approximately 25 - 30  % of space is reserved for parity.
2.Reading and writing is very fast. So, it produces high performance.
3.This is used Stripping with parity concept.

Solution :

One disk is failed we can recover the data using remaining two disks and parity.

Problem :

1.If two disks are failed, then we cannot recover the data.
2. There is no redundancy and fault tolerance in RAID - 5.


We have Two Disk  : Disk -1   is             /dev/sda
                                 Disk -2  is           /dev/sdc
                                    Disk -3  is           /dev/sdb

root@server~#fdisk  -l    ( Check free space in disk)

root@server~#fdisk  /dev/sdb   ( Chose disk  according to your system space)

root@server~#n     (Enter n for new disk)

root@server~#t      ( t used for choose your code lvm code is fd)

Note :You have to configure both disk and you can use code 8e etc.

Create the RAID - 5 using disk - 1 and disk - 2 and disk -3

root@server~
# mdadm -Cv       /dev/md5 -n 3 /dev/sda /dev/sdc /dev/sdb    -l    5

To check the RAID -5 is created or not :-

root@server~# cat /proc/mdstat

To create the ext4 file system on the RAID - 5

root@server~# mkfs.ext4 /dev/md5

RAID - 5 Mount point

root@server~# mkdir /mnt/raid5
root@server~# mount /dev/md5 /mnt/raid5

You can see the details of the RAID - 5 partition

root@server~# mdadm -D /dev/md5


Use Linux Network tool to maintain network


Use Linux Network tool to maintain network

                                              
Combination of two more computers connected together to share their resources each other by means of communication like cable is called Network.

Media :-

Media is nothing but cable to connect two or systems. Example : RJ 45, CAT 5 and CAT 6, ....etc.

NIC card :-

A Network Interface Card or controller is hardware component that connects a computer to a computer network.
Each NIC card will be having MAC (Media Access Controller) address to avoid conflicts between same NIC adapters.
In Linux these NIC adapter is represented by the word "eth" .
Example if two NIC cards are there in a system then it will be denoted as "eho","eth1", .....etc

Topology :-

Topology is a design in which the computers in network will be connected to each other. Example for
topologies
are Bus, Ring, Star, Mesh, Tree topologies.

protocol :-

Protocols are TCP/IP (Transmission Control Protocol), UDP (User Datagram
Protocol), HTTP. The most widely and regularly used protocols for transferring data are TCP and UDP. Let’s analyze some basic differences between TCP/IP and UDP.

Difference b/w TCP and UDP protocol

TCP is a connection oriented protocol and contain the information of sender as well as receiver.
Example : HTTP, FTP, Telnet
Note . TCP is slower than UDP due to its error checking mechanism
UDP protocols are connection less packets have no information to where they are going.
These type of ports are generally used for broadcasting.
Example : DNS, DHCP

IP ADDRESS

Every Computer will be assigned an IP address to identify each one to communicate in the network.
Classes of IP address :
The IP addresses are further divided into classes. The classes are A, B, C, D, E and the ranges are given


Class -A    0.0.0.0        127.255.255.255           255.0.0.0                /8
Class -B    128.0.0.0    191.255.255.255           255.255.0.0           /16
Class -C    192.0.0.0    223.255.255.255           255.255.255.0       /25
Class -D    224.0.0.0    239.255.255.255      
Class -E    240.0.0.0    255.255.255.255

How to set IP address in Linux  :

Using nmcli command  ( Network Namager command line interface )
Setup In RHEL -7

root@server:~#nmcli con show         (to see all the network connection names)

root@server:~# nmcli device show      (It displays all the NIC devices network information of the system )

root@server:~# nmcli device show eth0  (to see all the network devices information of the eth0)

root@server:~# nmcli connection add con-name <connection name> ifname <NIC device name> type ethernet   (to create a new connection name for eth0)

root@server:~#nmcli con add con-name eth0 ifname ens33 type ethernet  (Enter)
root@server:~#nmcli con show        (show create connection)

root@server:# nmcli connection modify eth0  ipv4.address 192.168.105.10/24

root@server:#nmcli con up eth0  (to activate or up the specified connection)

root@server:# nmcli connection down  eth0  (to disable or down the specified connection)
root@server:# nmcli connection show eth0 (to see the information about the specified NIC)

root@server:# ping  192.168.105.10  (to check the connection from NIC device to IP address)

Loopback address:-

A special IP number (127.0.0.1) is designated for the software loopback interface of a machine.
127.0.0.0 and 127.255.255.255 is also reserved for loopback and is used for internal testing on local machines.

subnet mask :-

A subnet mask allows the users to identify which part of an IP address is reserved for the network and which part is available for host use.

Gateway :-

A Gateway is the network point that provides entrance into another network.
For example: Our network is 192.168. something and we want to
send a file to other computer on 10.10.network, so we need a gateway to communicate between two computers of different networks.

root@server:~# netstat -r        (to check the default gateway and routing table)

Some Important configuration files in Linux 

root@server:~# cat /etc/sysconfig/network-scripts/  This directory keep the configuration of network devices connected to the system.
Examples  ifcfg-eht0, ifcfg-eth1, ifcfg-eth2, .....etc.

# cat /etc/sysconfig/network

This file keeps the information about the hostname assigned to the system and  we want to change the hostname permanently using this file .

RHEL - 6 : To set hostname temporarily in linux
ex:
# hostname  server.example.com 

RHEL - 6 : To set the hostname permanently in linux

root@server:~# vim /etc/sysconfig/network
                            HOSTNAME=server.example.com            (save and exit this file)

root@server:~# service network restart

root@server:~# chkconfig network on   (to enable the connection at next reboot)

RHEL - 7 :To set hostname temporaril in linux

root@server:~# hostname   server.example.com   (set the hostname temporarily)

RHEL - 7 :To set hostname permanently in linux

root@server:~#hostnamectl set-hostname server.example.com 
                                                                            (to set the hostname permanently)

# hostname -i                         (to see the IP address of the system)
# hostname -d                        (to check the domain name of the system)
# hostname -s                        (to check the hostname without domain name)


# cat /etc/resolve.conf
This file keeps the address of the DNS server to which the clients will be accessing to resolve IP address to hostname and hostname to IP address .

You can edit this file and set server ip address and hostname
root@server:~# vim /etc/resolve.conf
                         #Generated by NetworkManager
                          search example.com
                          nameserver 192.168.105.10
      Save and quite .

Now using nslookup and dig command you can check it is resolve the ip to hostname and hostname to ip.

 nslookup command

root@server:~# nslookup 192.168.105.10
 server : 192.168.105.10
 Address  192.168.105.10#53

10.105.168.192.in-addr.arpa name=example.com                                 
10.105.168.192.in-addr.arpa name=server.example.com

The most common command used to check DNS function is “dig”

root@server:~#dig server.example.com

root@server:~#dig -x 192.168.105.10


How to check all the open ports of your machine?

root@server:~#nmap localhost

How to check all the open ports of remote machine?

root@server:~#nmap  192.168.105.110 (Remote machine ip address)

Check all the listening ports and services of your machine.

root@server:~# netstat -ntulp
                                -n -----> port no. (numeric no)
                                -t ----->tcp protocol
                                -u -----> upd protocol
                                -l -----> port is listening or not
                                -p -----> display the process ID

root@server:~# ifconfig              (to check the NIC card is enable or not)

root@server:~# ip addr show     (to show all NIC devices present on the system)

root@server:~# hostname -i       (to see the IP address of the system)

root@server:~# hostname -d      (to check the domain name of the system)

root@server:~# hostname -s      (to check the hostname without domain name)